My Experiences with Android Development

Because I was missing coding, and because my friend and I had an awesome phone app idea at the weekend, I thought I'd try my hand at developing an Android application this week.

I want to give a quick overview of my preliminary thoughts on getting started on this endeavour.

Background: I've got more than 10 years Java experience, but any UI for the applications I've worked on was always a web UI. I am completely new to mobile app development.

Continue reading "My Experiences with Android Development"

GWT: Why VerticalPanel is Evil

At LMAX we adopted Google Web Toolkit pretty early on. One of the motivations for using it was so we only had to worry about recruiting Java guys, and then we could all work on every part of the application including the web UI. Sure, you can learn a bunch of different skills if you want to, but it reduced context-switching and kept the skill set we were hiring for to a nice short list.

The problem is that GWT does a very nice job of pretending to be Java whilst actually compiling down to HTML and JavaScript. If you don't have some understanding of the end result (the DOM the browser is going to be rendering) it's going to be hard to get the performance you need from a low-latency trading application.

My number one bug-bear with GWT is VerticalPanel. To the uninitiated developer, this seems like the sort of thing that will be useful everywhere. You often want stuff stacked on top of each other - think menus, lists, the layout of a dialog. What is not obvious is that it uses tables for layout under the covers, and I've mentioned in the past that Tables Should Not Be Used For Layout.

A much less obvious way of getting the same result with (usually) no extra effort is to use FlowPanel. This is rendered as a div, and most of the time the elements that get inserted into it will render in a vertical stack.

VerticalPanel Code

VerticalPanel panel = new VerticalPanel();
panel.add(/* your widget */);
panel.add(/* your second widget */);

VerticalPanel Rendered As HTML

<table>
  <tbody>
    <tr>
      <td>
        <!– your widget here –>
      </td>
     <tr>
    <tr>
      <td>
        <!– your second widget here –>
      </td>
     <tr>
  </tbody>
<table>

FlowPanel Code

FlowPanel panel = new FlowPanel();
panel.add(/* your widget */);
panel.add(/* your second widget */);

FlowPanel Rendered As HTML

<div>
  <!– your widget here –>
  <!– your second widget here –>
</div>

You can see that the DOM generated for a very similar-looking 3 lines of code is much much smaller for FlowPanel.

Who Cares?

Right, but we're only talking about a few more elements, and browsers are pretty smart about optimising these things. Right?

Maybe. But if you use VerticalPanel for all your containers, for every box which needs to be a slightly different colour, for every place you want to change the alignment slightly, things get very big very fast. This is an example of real code from an early prototype, where we had several nested panels (not unheard of if you've got a complex dialog box with lots of elements in it. Like, say, a deal ticket). And I've stripped out a lot of the table attributes that made this even more heinous:

<table>
  <tbody>
    <tr>
      <td align="left”>
        <table id="panel1”>
          <tbody>
            <tr>
              <td align="left” style="vertical-align: top;">
                <table class="orders-input”>
                  <tbody>
                    <tr>
                      <td align="left”>
                        <table class="row”>
                          <tbody>
                            <tr>
                              <td align="left”>
                                <table id="container”>
                                  <tbody>
                                    <tr>
                                      <table id="panel2”>
                                        <tbody>
                                          <tr>
                                            <td align="left”>
                                              <table class="controls”>
                                                <tbody>
                                                  <tr>
                                                    <td align="left”>
                                                      <!– widget –>

For every table element and associated elements (tbody, tr, td), you would get a single div element instead if you simply replace every instance of VerticalPanel in this stack with a FlowPanel.

<div>
  <div id="panel1”>
    <div class="orders-input”>
      <div class="row”>
        <div id="container”>
          <div id="panel2”>
            <div class="controls”>
              <!– widget –>

See? Much nicer.

This is exactly what we did do, and we saw a noticeable speed improvement across all browsers - noticeable to a real user, not just some millisecond improvement on a performance test. Mind you, users' brains are amazing things and your system has to react in less than 0.1 seconds for a user to perceive it as instantaneous. So even in a browser, every millisecond counts.

In addition to improved performance, you get a nice bonus: now the layout is no longer controlled by tables, you can really easily shove stuff around and make things look pretty with the clever use of CSS. If you're really lucky, you can chuck that stuff over to your designers and not have to do another GWT compile when someone wants to move things 3 pixels to the left. Which they will.

FogBugs and Kiln World Tour

Last Thursday I was fortunate enough to get a place on the FogBugz and Kiln World Tour. I booked it before I moved jobs, and I'll be honest I had no real interest in the software. I've been reading Joel's books and blogs since my friend Brent bought me Joel on Software and made me read it (he had the foresight to know I'd want to hang on to his copy if he'd lent it to me!). I wanted to see the man in the flesh and hear what he had to say about his software. Because really, do we honestly need yet another bug-tracking / project-management tool?

Continue reading "FogBugs and Kiln World Tour"

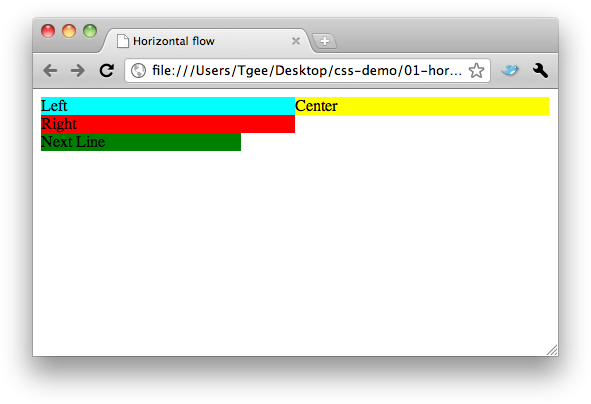
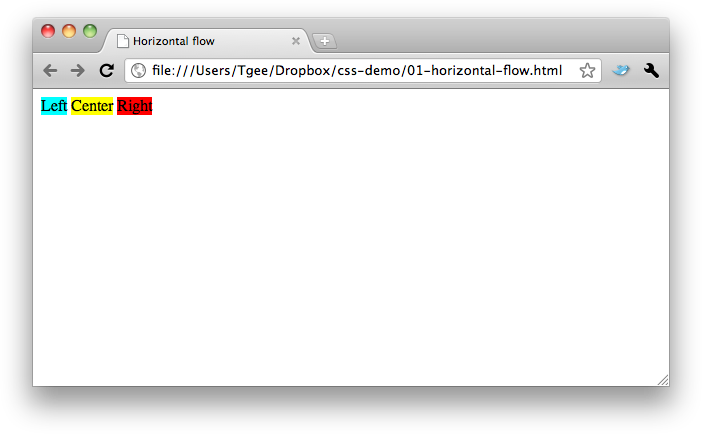
CSS for Developers: Horizontal Layout Using CSS

I'm a Java Developer. But I'm also a Web Developer. Web Developers have been so badly maligned over the last decade or so that I always feel wary (and sometimes slightly ashamed) admitting this. There's some sort of assumption that Web Developers (and Front End Developers) aren't real programmers. Similarly, "real" developers don't like to be tainted by coming into contact with that nasty "front end stuff" in case someone mistakes them for a designer.

Trust me, no-one is going to mistake a Java Developer for a designer. For a start, when designers wear geeky glasses it's ironic. Or chic. Or something.

But developers will be forced to do something around the front end at some point in their lives. Even if it's because they're sick of manually kicking off some process and want to give the users a big red button to press instead.

Continue reading "CSS for Developers: Horizontal Layout Using CSS"

Validation with Spring Modules Validation

So if java generics slightly disappointed me lately, what have I found cool?

I'm currently working on a web application using Spring MVC, which probably doesn't come as a big surprise, it seems to be all the rage these days. Since this is my baby, I got to call the shots as to a lot of the framework choices. When it came to looking at implementing validation, I refused to believe I'd have to go through the primitive process of looking at all the values on the request and deciding if they pass muster, with some huge if statement. Even with Spring's rather marvelous binding and validation mechanisms to take the worst of the tasks off you, it still looked like it would be a bit of a chore. Given all the cool things you can do with AOP etc I figured someone somewhere must've implemented an annotations-based validation plugin for Spring.

And they have. And there's actually a reasonable amount of information about how to set it up and get it working. The problem is that it's pretty flexible and has a lot of different options, so when you are running Java 1.5 and Spring 2.0, and actually want to use the validation in a simple, straightfoward fashion, the setup instructions get lost.

So here's my record so I don't forget in future how I did it.

As a brief summary for those who may not be familiar with Spring, or for those who need reminding (no doubt me in a few months when I've completely forgetten what I was working on), Spring provides a Validator interface that you can use to easily plug validation into your application. In the context of web applications, you create your various Validators and in your application context XML file you tell your Controllers to use those validators on form submission (for example).

Spring Modules validation provides a bunch of generic validation out of the box for all the tedious, standard stuff - length validation, mandatory fields, valid e-mail addresses etc (details here). And you can plug this straight into your application by using annotations. How? Easy.

This is my outline application context file:

<?xml version="1.0" encoding="UTF-8"?>
<beans xmlns=" http://www.springframework.org/schema/beans"
xmlns_xsi="http://www.w3.org/2001/XMLSchema-instance "
xmlns_vld="http://www.springmodules.org/validation/bean/validator "
xsi_schemaLocation="http://www.springframework.org/schema/beans http://www.springframework.org/schema/beans/spring-beans-2.0.xsd
http://www.springmodules.org/validation/bean/validator http://www.springmodules.org/validation/bean/validator.xsd">

    <vld:annotation-based-validator id="validator" />

    <!– Load messages –>
    <bean id="messageSource"
        class="org.springframework.context.support.ResourceBundleMessageSource">
        <property name="basenames" value="messages,errors" />
    </bean>

    <!– Bean initialisation for validation. You can put these explicitly into your controllers or set to autowire by name or type –>
    <bean id="messageCodesResolver"
        class="org.springmodules.validation.bean.converter.ModelAwareMessageCodesResolver" />

</beans>

Really all you're interested in is the addition of the validation namespace and schema at the top of the file, and the <vld:annotation-based-validator id="validator" > line which is your actual validator. The other sections are a message source so your error codes can have meaningful messages and a MessageCodeResolver to make use of these.

Eclipse does seem to moan about the way the springmodules schema is referenced, but when you actually start Tomcat up it seems happy enough.

I've chosen to give the validator the ID validator because I turned autowire by name on so that all my controllers picked up this validation by default. Note: autowire can be a little bit dangerous and I've actually turned it off now because I had a validator bean and a validators list in the context file and my poor SimpleFormController controllers were getting a bit confused over which one to use (in truth, the single validator was overwriting the list, which was not what I was after at all).

Anyway. Now what? We have a validator and we've probably wired it into the relevant controllers, either by autowiring them or poking it specifically into our controllers like this:

<bean id="somePersonController"
    class="com.mechanitis.examples.validation.controller.MyPersonController">
    <property name="commandClass"
        value="com.mechanitis.examples.validation.command.PersonCommand" />
    <property name="formView" value="person" />
    <property name="successView" value="success" />
    <property name="validator" ref="validator"/>
</bean>

Next step is to add some validation rules. The documentation will show you how to do this using an XML file, which you're perfectly welcome to do. However, what I wanted to show is how to use annotations on your command object to declare your validation. So here you are:

import org.springmodules.validation.bean.conf.loader.annotation.handler.CascadeValidation;
import org.springmodules.validation.bean.conf.loader.annotation.handler.Email;
import org.springmodules.validation.bean.conf.loader.annotation.handler.Length;
import org.springmodules.validation.bean.conf.loader.annotation.handler.Min;
import org.springmodules.validation.bean.conf.loader.annotation.handler.NotNull;

public class PersonCommand {
private static final int NAME_MAX_LENGTH = 50;

    @NotNull
    @Length(min = 1, max = NAME_MAX_LENGTH)
    private String name;

    @Min(value=1)
    private Long age;

    @Email
    private String eMail;

    @CascadeValidation
    private RelationshipCommand relationship = new RelationshipCommand();

    private String action;

    //insert getters and setters etc

}

Note that @CascadeValidation tells the validator to run validation on the enclosed secondary Command.

This is just a simple example obviously. But hopefully you can see that now you've got the validator set up correctly in your application context file, all you need to cover 90% of your validation needs is to tag the relevant fields with the type of validation you want. If you want to get really clever, the validator supports Valang which allows you to write simple rules. For example, if I only want to validate the name when I'm saving the person rather than passing the command around for some other purpose, I might change the annotations on the name field:

@NotNull(applyIf="action EQUALS ‘savePerson’")
@Length(min = 1, max = NAME_MAX_LENGTH, applyIf="action EQUALS ‘savePerson’")
private String name;

That's the basics. Before I let you go off and play though, a word about error messages. As usual with Spring validators, you can specify pretty messages to be displayed to the user when things go wrong. In my application context file above you should see that I've specified a properties file called errors. In this file you can map your error codes to the message to display. When using the spring modules validation I found the error codes generated were like the ones below so you might have an errors.properties file that looks like this:

# *** Errors for the Person screens
PersonCommand.age[min]=An age should be entered
PersonCommand.name[length]=Person name should be between 1 and 50 characters
# etc etc

# *** General errors
not.null=This field cannot be empty

Go play.