You might think, particularly given the order in which I have posted these blog posts, that I tackled the easiest application first when I decided to upgrade my JavaFX applications. But no. Because I like to live life on Hard Mode.
I spent two full days last week once again tackling the on-going tech debt I had with a Modular JavaFX application. And I won! Yay! So here's my experience report.
Backstory
I created a modular application to demonstrate Java's Module System, and other Java 9 features, based off my Java 8 demo. Since it was developed at the same time that Java 9 was bring developed, it was always a little... fragile. In particular, it (originaly) couldn't use a build tool like Maven or Gradle because neither of these supported Java 9 before it was released.
After I stopped using the application to demo Java 9 features, I tried to continue moving the project forward, for example finally fitting Gradle onto it, and fighting with all that modularity entailed in this brave new world.
Therefore when I came to upgrade the application last week, my problems included:
- Not having updated the code/dependencies in the main branch since August 2018
- Not having invested enough time into having a stable, reproducable command-line build for the application
- Gradle having changed significantly over time with regards to suport for Java Modules
- Java Modularity in general
Note that none of these are specifically JavaFX problems, but add into the mix the intricacies of getting JavaFX to work with the Java Module System and a build tool, and the whole thing felt a bit like trying to add to a house of cards. In the dark. With oven mitts on your hands.
Early last year I made a stab at upgrading to Gradle 6.4 and upgrading everything else along the way. There's a branch for that, but to be honest I couldn't face going back into it and working out what state it was, so I just started at the latest state that main was in. At this starting stage, with the current version of IntelliJ IDEA etc, nothing was working. I couldn't even remember what the problems were, what I'd researched, what I'd tried, and what I'd planned to do next. I decided to assume I was new to the project and start as simply as possible.
Steps
Back end services
- Remove all modules from the application (by removing them from
settings.gradleand letting IntelliJ IDEA remove them as modules in the project) and focus only on the two "leaf" modules that don't depend on anything else. - Instead of having a common
build.gradlefor all the modules, I moved all configuration into each individual module, even if that meant having duplication. This way I could get a much better handle on what was really needed and where the complications were. - Removed
ext.moduleNamefrom the build files, this didn't seem to be required for modular Gradle applications anymore. - Made sure each module was using the correct plugin - either java-library or application. This seems more relevant given the updated dependency configurations.
-
Added the following to all the build files:
java {
    modularity.inferModulePath = true
}
which is now the correct way to identify that this project uses the Java Module System.
- Updated all dependencies (of just these two leaf modules to begin with) to the most recent versions, and use the newest dependency configurations (i.e.
implementationnotcompile). - Updated the module name in 'module-info.java' for those automatic modules that now have automatic module names declared in their MANIFEST.MF.
- Applied a Gradle plugin to give me some sort of control over automatic modules (i.e. dependencies that are not real Java Modules). This was not my favourite solution, but it did pretty much work, although it makes the build file more complicated that I want it to be.
- Make sure everything compiles/builds, and check in changes.
- Repeat steps 3-7 with modules that depend only upon these leaf modules. Apply step 8 if required. Compile, build, check in.
- Repeat steps 3-7 with the next level of modules. Apply step 8 if required. Compile, build, check in.
JavaFX UI
Once all the back-end service build files have been fixed, and we've checked they all compile and run correctly, then we can finally turn our attention to the JavaFX module.
- As per the JavaFX and Gradle with Modules section of the OpenJFX Getting Started Documentation, the JavaFX Gradle Plugin (version 0.0.9) doesn't work for building modular JavaFX applications in Gradle 6.7 and above. So instead of using the plugin I needed to use the native Gradle support for modules, and add a bit of code to do what the JavaFX plugin would have done for me. I created a
getJavaFXPlatformmethod in my build.gradle file, amongst other things. I hope that later versions of the plugin will allow me to remove all this custom code. - Applied step 8. My specific problem, for reference, is that I'm depending upon the Java Websocket API, which does not have an automatic module name in the manifest file, and so Gradle adds it to the classpath, not modulepath, then I can't refer to it in my
module-info.java. Maybe there's a better way of using dependencies on the classpath in a modular application, but I haven't figured it out. - I also had to mess around with where the resource files (FXML and CSS files) were loaded from. Resource loading seems to have changed (since Java 9 and modules, but also I think something changed later because this was always a Java 9 application and yet it now doesn't load resources the way it used to), and on top of that it may work differently with modularity. If you care about the details, you can dig around in the specific commit. Also, while I could run the application successfully from the command line using Gradle, there was a problem with IntelliJ IDEA not letting the application get to the resource files when the application runs from the IDE. I'm not sure if that's exactly this issue or something related, but it's worth being aware of. It means I can't run the application from the editor in IntelliJ IDEA.
-
Specifically declared Java 15 as a dependency in all build.gradle files using
 java {
    toolchain {
        languageVersion.set(JavaLanguageVersion.of(15))
    }
 }
Not sure if that actually worked to be honest, but everything still ran.
Running the Application
This application runs from the command line (or IntelliJ IDEA terminal window) with:
./gradlew com.mechanitis.demo.sense.client:runor you can run it from the IntelliJ IDEA Gradle tool window
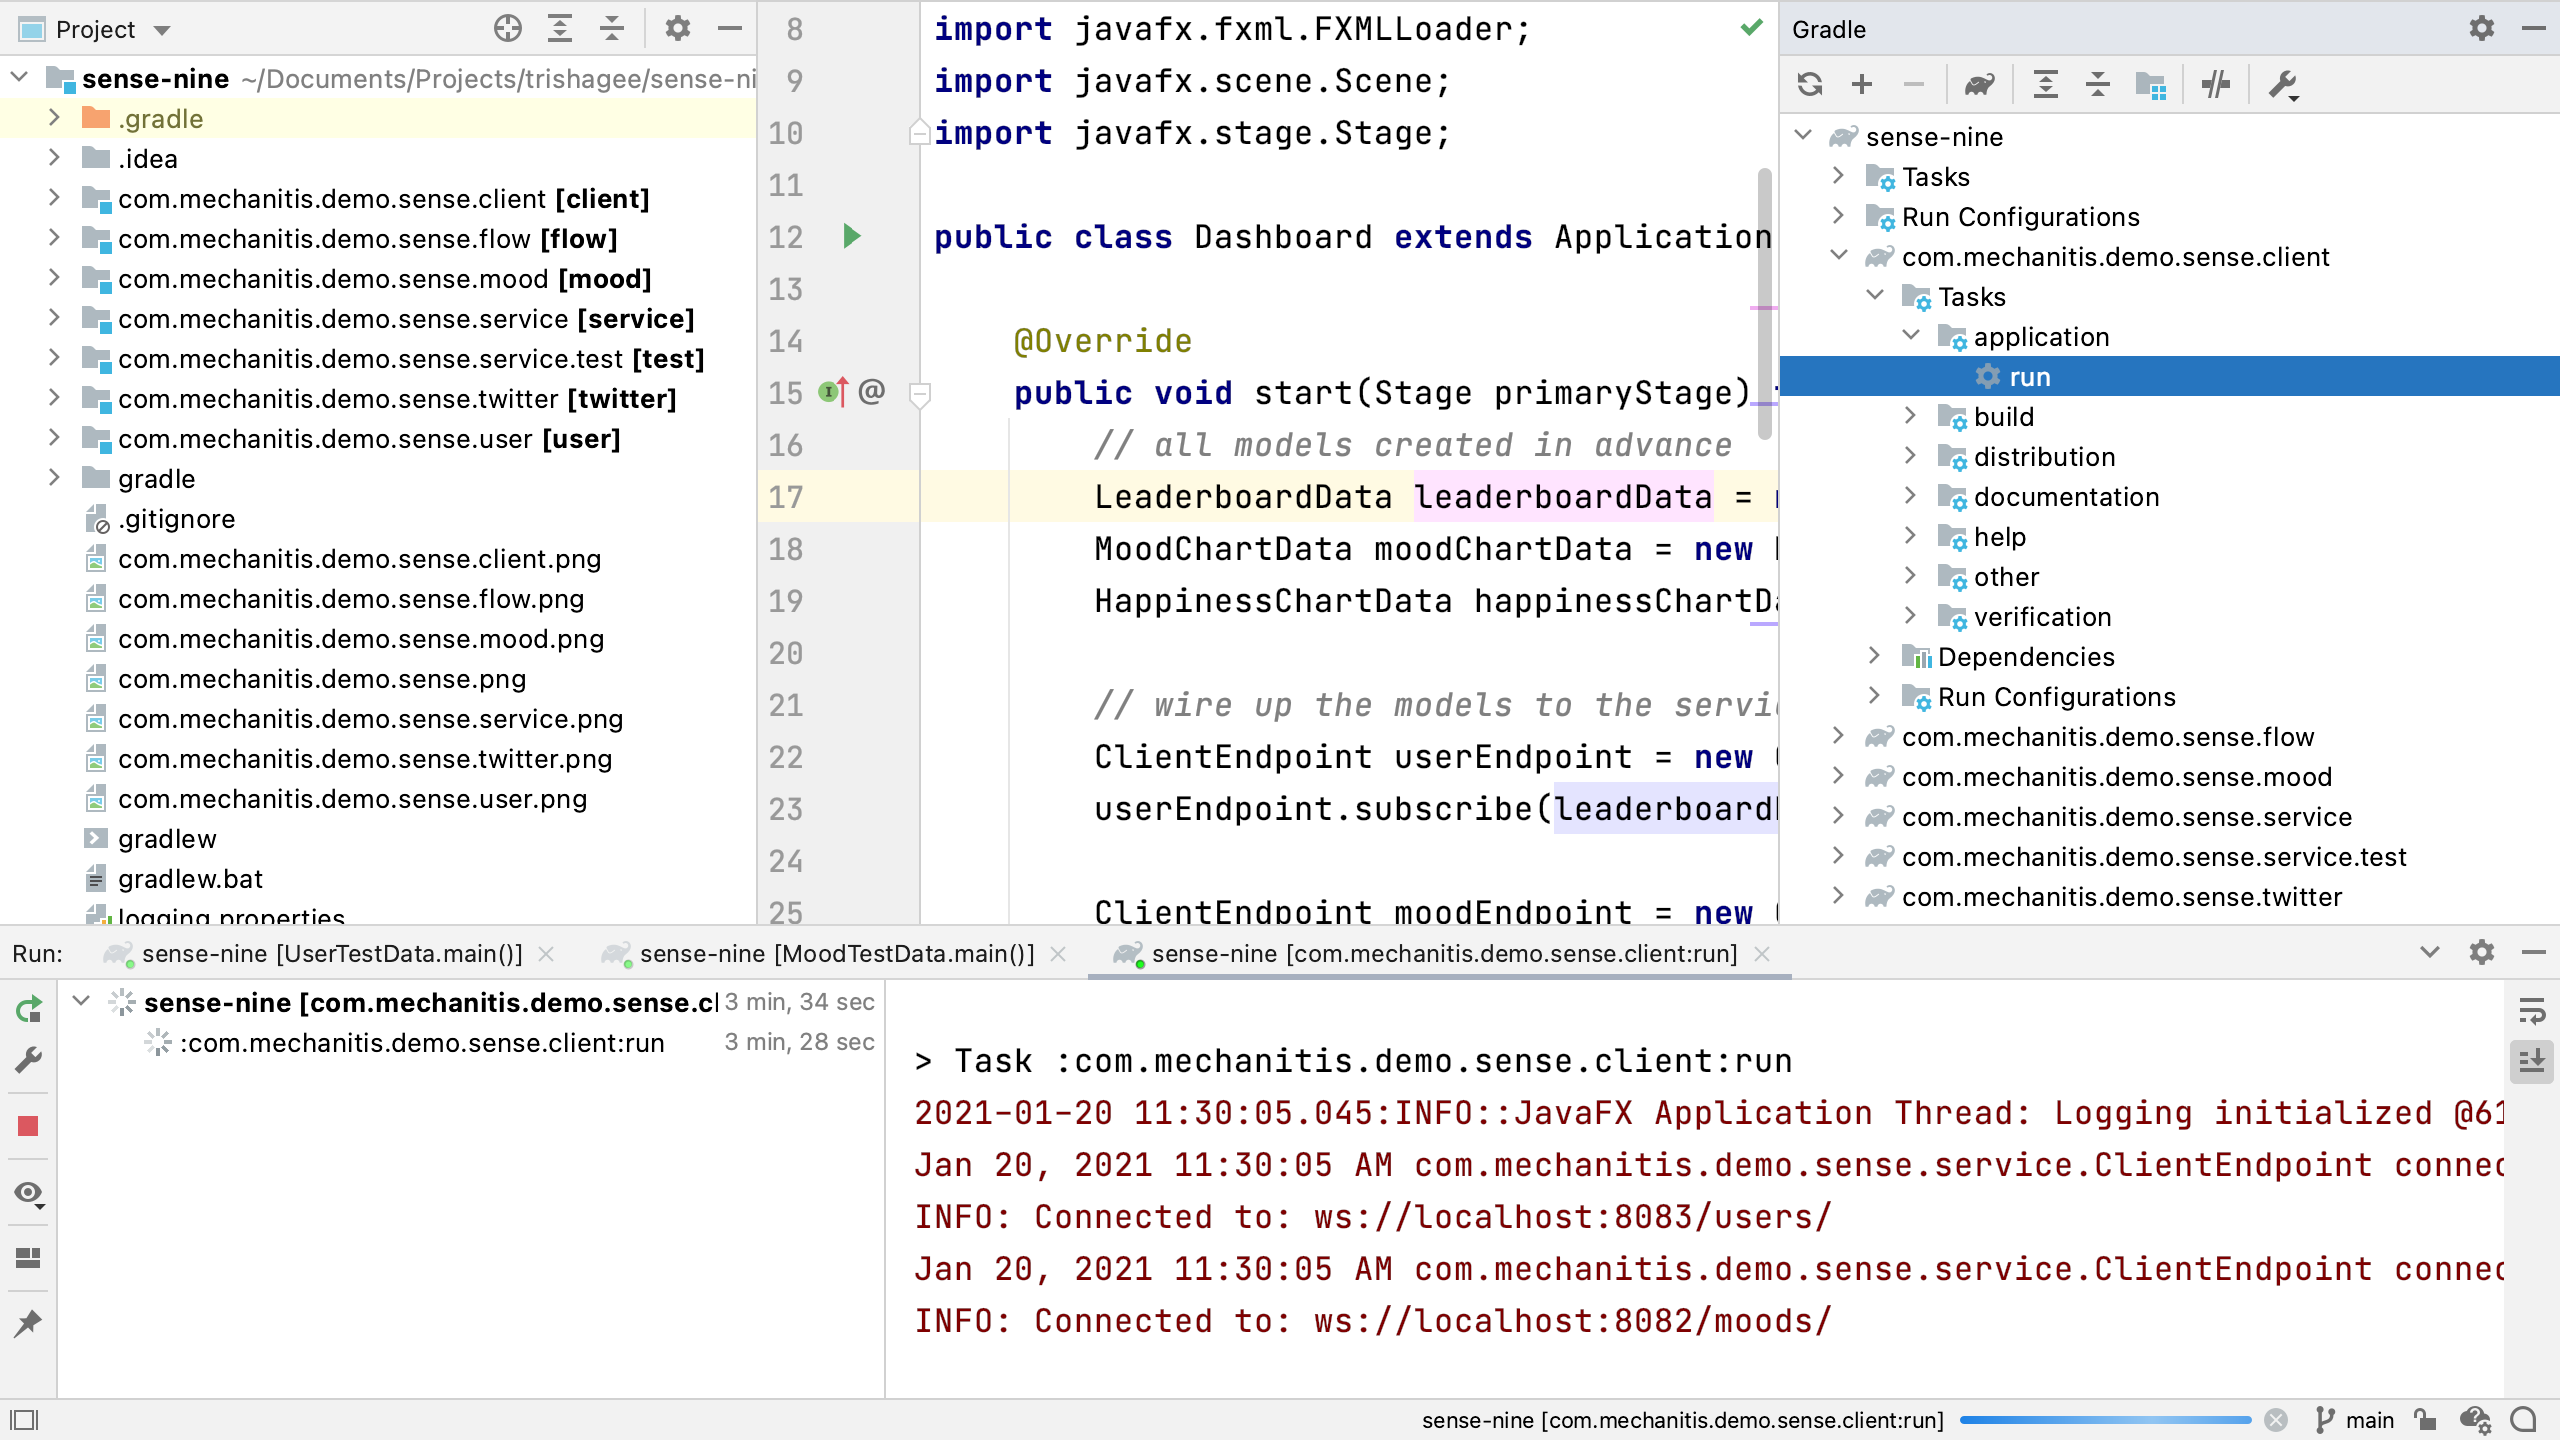
or from "Run Anything" (Ctrl Ctrl)
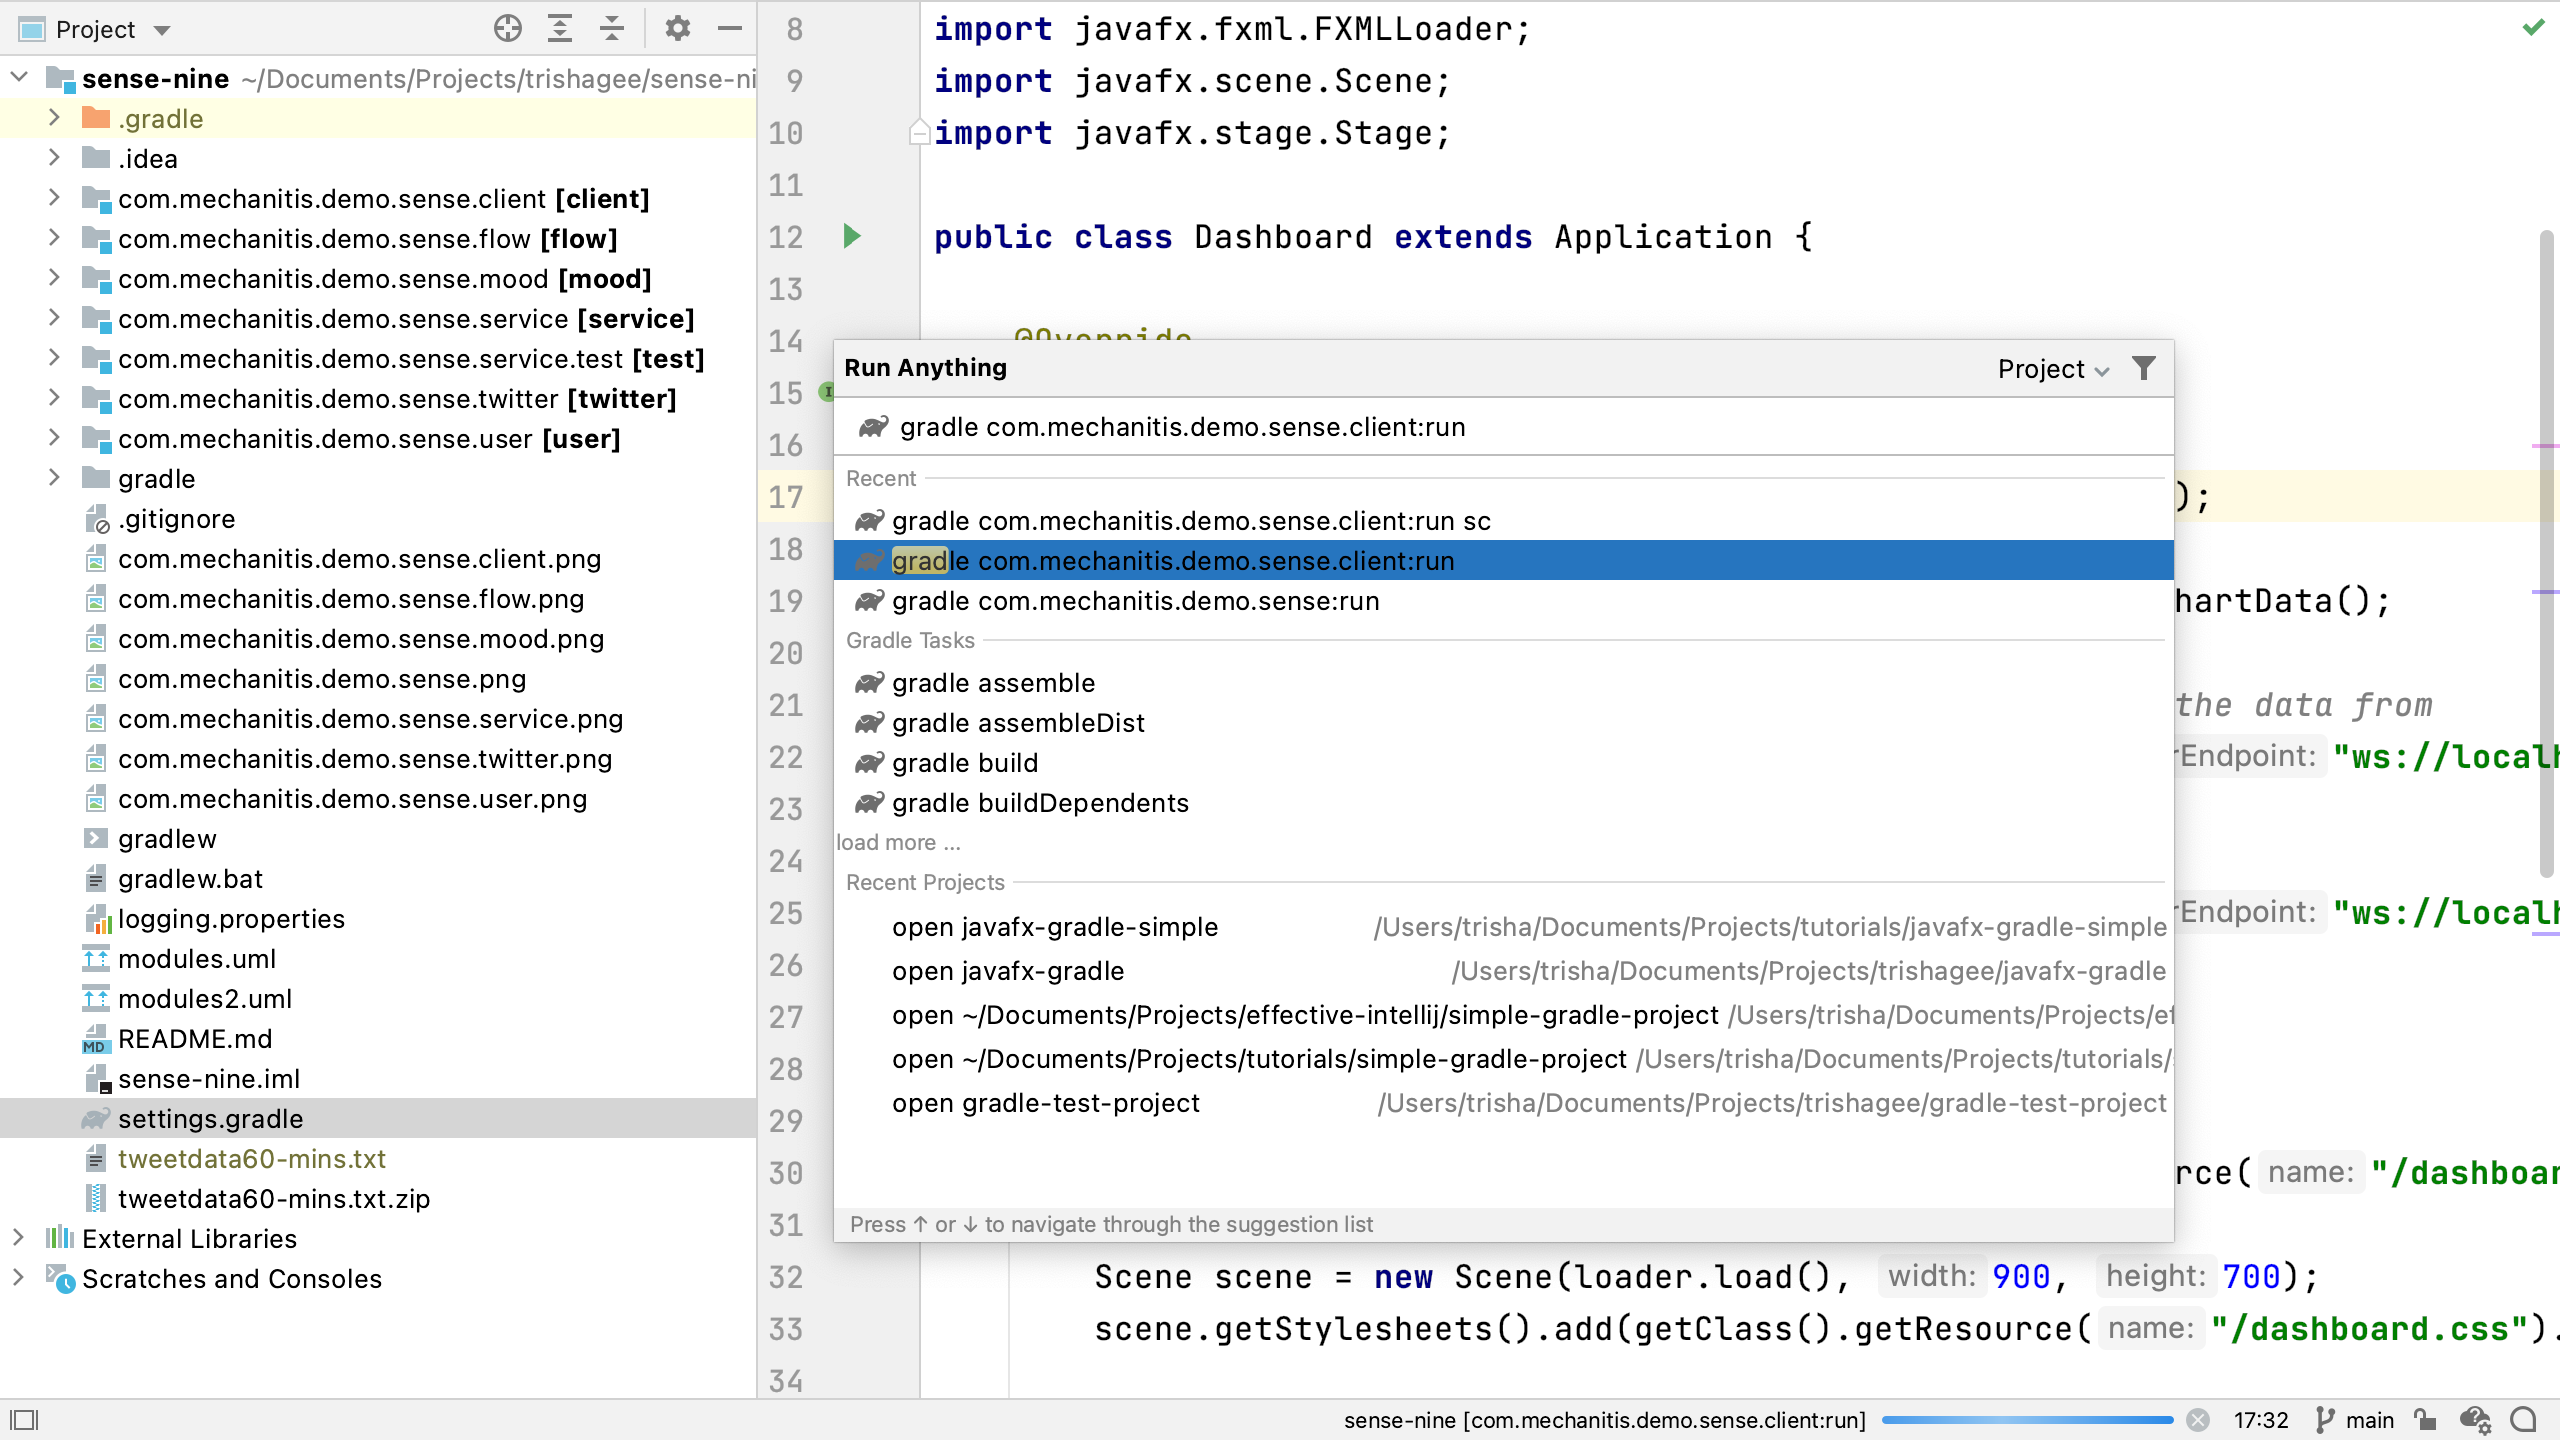
It does not run via the editor in IntelliJ IDEA (i.e. the green arrow gutter icons, or the run shortcuts ⌃⇧R (MacOS) or Ctrl+Shift+F10 (Windows)) from Dashboard.java because of the aforementioned problem with loading resource files (FXML and CSS). However, running via Gradle in IntelliJ IDEA still creates a valid Run Configuration which is just as easy to use in most circumstances.
I'm not sure how to workaround the problem of IntelliJ IDEA not seeing the resource files correctly. I may raise an issue in the issue tracker, or I may find a more reliable way to load files.
Resources
- Code on GitHub
- Videos, slides and more info on the application
- OpenJFX Getting Started Documentation
See also: