Using Groovy to import XML into MongoDB

This year I've been demonstrating how easy it is to create modern web apps using AngularJS, Java and MongoDB. I also use Groovy during this demo to do the sorts of things Groovy is really good at - writing descriptive tests, and creating scripts.

Due to the time pressures in the demo, I never really get a chance to go into the details of the script I use, so the aim of this long-overdue blog post is to go over this Groovy script in a bit more detail.

Firstly I want to clarify that this is not my original work - I stole borrowed most of the ideas for the demo from my colleague Ross Lawley. In this blog post he goes into detail of how he built up an application that finds the most popular pub names in the UK. There's a section in there where he talks about downloading the open street map data and using python to convert the XML into something more MongoDB-friendly - it's this process that I basically stole, re-worked for coffee shops, and re-wrote for the JVM.

I'm assuming if you've worked with Java for any period of time, there has come a moment where you needed to use it to parse XML. Since my demo is supposed to be all about how easy it is to work with Java, I did not want to do this. When I wrote the demo I wasn't really all that familiar with Groovy, but what I did know was that it has built in support for parsing and manipulating XML, which is exactly what I wanted to do. In addition, creating Maps (the data structures, not the geographical ones) with Groovy is really easy, and this is effectively what we need to insert into MongoDB.
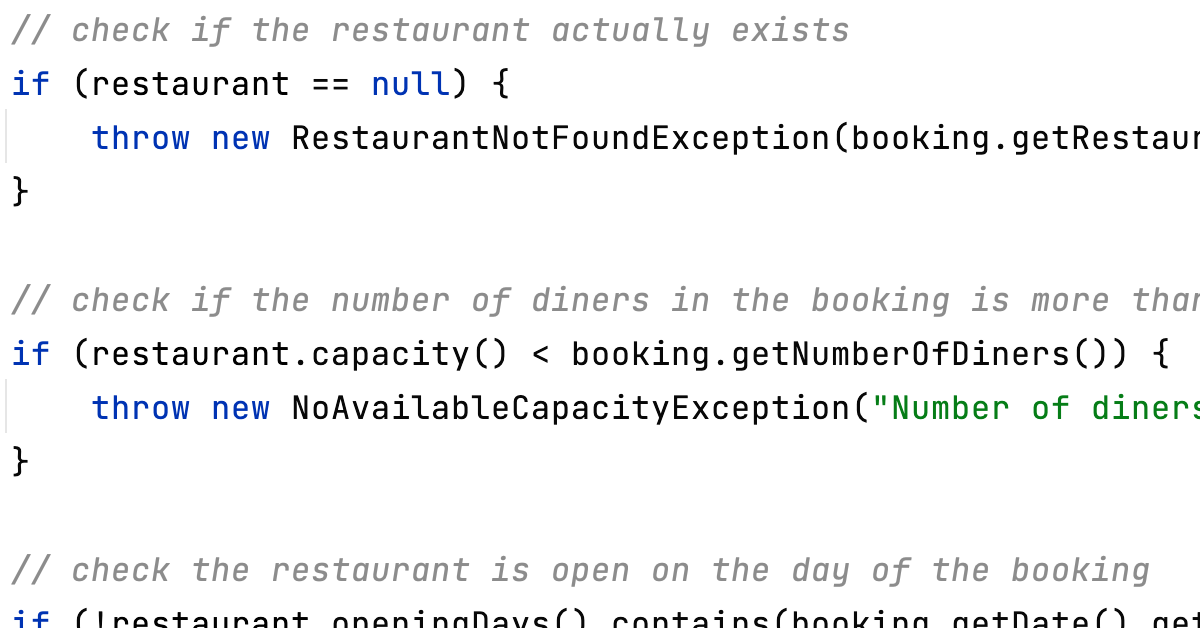
Goal of the Script

  • Parse an XML file containing open street map data of all coffee shops.
  • Extract latitude and longitude XML attributes and transform into MongoDB GeoJSON.
  • Perform some basic validation on the coffee shop data from the XML.
  • Insert into MongoDB.
  • Make sure MongoDB knows this contains query-able geolocation data.

The script is PopulateDatabase.groovy, that link will take you to the version I presented at JavaOne:

PopulateDatabase.groovy

Firstly, we need data

I used the same service Ross used in his blog post to obtain the XML file containing "all" coffee shops around the world. Now, the open street map data is somewhat... raw and unstructured (which is why MongoDB is such a great tool for storing it), so I'm not sure I really have all the coffee shops, but I obtained enough data for an interesting demo using

http://www.overpass-api.de/api/xapi?*[amenity=cafe][cuisine=coffee_shop]

The resulting XML file is in the github project, but if you try this yourself you might (in fact, probably will) get different results.

Each XML record looks something like:

<node id="178821166" lat="40.4167226" lon="-3.7069112">
    <tag k="amenity" v="cafe"/>
    <tag k="cuisine" v="coffee_shop"/>
    <tag k="name" v="Chocolatería San Ginés"/>
    <tag k="wheelchair" v="limited"/>
    <tag k="wikipedia" v="es:Chocolatería San Ginés"/>
</node>

Each coffee shop has a unique identifier and a latitude and longitude as attributes of a node element. Within this node is a series of tag elements, all with k and v attributes. Each coffee shop has a varying number of these attributes, and they are not consistent from shop to shop (other than amenity and cuisine which we used to select this data).

Initialisation

Script Initialisation

Before doing anything else we want to prepare the database. The assumption of this script is that either the collection we want to store the coffee shops in is empty, or full of stale data. So we're going to use the MongoDB Java Driver to get the collection that we're interested in, and then drop it.

There's two interesting things to note here:

  • This Groovy script is simply using the basic Java driver. Groovy can talk quite happily to vanilla Java, it doesn't need to use a Groovy library. There are Groovy-specific libraries for talking to MongoDB (e.g. the MongoDB GORM Plugin), but the Java driver works perfectly well.
  • You don't need to create databases or collections (collections are a bit like tables, but less structured) explicitly in MongoDB. You simply use the database and collection you're interested in, and if it doesn't already exist, the server will create them for you.

In this example, we're just using the default constructor for the MongoClient, the class that represents the connection to the database server(s). This default is localhost:27017, which is where I happen to be running the database. However you can specify your own address and port - for more details on this see Getting Started With MongoDB and Java.

Turn the XML into something MongoDB-shaped

Parse & Transform XML

So next we're going to use Groovy's XmlSlurper to read the open street map XML data that we talked about earlier. To iterate over every node we use: xmlSlurper.node.each. For those of you who are new to Groovy or new to Java 8, you might notice this is using a closure to define the behaviour to apply for every "node" element in the XML.

Create GeoJSON

Create GeoJSON Since MongoDB documents are effectively just maps of key-value pairs, we're going to create a Map coffeeShop that contains the document structure that represents the coffee shop that we want to save into the database. Firstly, we initialise this map with the attributes of the node. Remember these attributes are something like:

<node id="18464077" lat="-33.8911183" lon="151.1958773">

We're going to save the ID as a value for a new field called openStreetMapId. We need to do something a bit more complicated with the latitude and longitude, since we need to store them as GeoJSON, which looks something like:

{ 'location' : { 'coordinates': [<longitude>, <latitude>],
                 'type'       : 'Point' } }

In lines 12-14 you can see that we create a Map that looks like the GeoJSON, pulling the lat and lon attributes into the appropriate places.

Insert Remaining Fields

Insert Remaining Fields

Validate Field Name

Now for every tag element in the XML, we get the k attribute and check if it's a valid field name for MongoDB (it won't let us insert fields with a dot in, and we don't want to override our carefully constructed location field). If so we simply add this key as the field and its the matching v attribute as the value into the map. This effectively copies the OpenStreetMap key/value data into key/value pairs in the MongoDB document so we don't lose any data, but we also don't do anything particularly interesting to transform it.

Save Into MongoDB

Save Into MongoDB

Finally, once we've created a simple coffeeShop Map representing the document we want to save into MongoDB, we insert it into MongoDB if the map has a field called name. We could have checked this when we were reading the XML and putting it into the map, but it's actually much easier just to use the pretty Groovy syntax to check for a key called name in coffeeShop.

When we want to insert the Map we need to turn this into a BasicDBObject, the Java Driver's document type, but this is easily done by calling the constructor that takes a Map. Alternatively, there's a Groovy syntax which would effectively do the same thing, which you might prefer:

collection.insert(coffeeShop as BasicDBObject)

Tell MongoDB that we want to perform Geo queries on this data

Add Geo Index

Because we're going to do a nearSphere query on this data, we need to add a "2dsphere" index on our location field. We created the location field as GeoJSON, so all we need to do is call createIndex for this field.

Conclusion

So that's it! Groovy is a nice tool for this sort of script-y thing - not only is it a scripting language, but its built-in support for XML, really nice Map syntax and support for closures makes it the perfect tool for iterating over XML data and transforming it into something that can be inserted into a MongoDB collection.

Converting Blogger to Markdown

I've been using Blogger happily for three years or so, since I migrated the blog from LiveJournal and decided to actually invest some time writing. I'm happy with it because I just type stuff into Blogger and It Just Works. I'm happy because I can use my Google credentials to sign in. I'm happy because now I can pretend my two Google+ accounts exist for a purpose, by getting Blogger to automatically share my content there.

A couple of things have been problematic for the whole time I've been using it though:

  1. Code looks like crap, no matter what you do.
  2. Pictures are awkwardly jammed in to the prose like a geek mingling at a Marketing event.

The first problem I've tried to solve a number of ways, with custom CSS at a blog- and a post- level. I was super happy when I discovered gist, it gave me lovely content highlighting without all the nasty CSS. It's still not ideal in a blogger world though, as the gist doesn't appear in your WYSIWYG editor, leading you to all sorts of tricks to try not to accidentally delete it. Also I was too lazy to migrate old code over, so now my blog is a mish-mash of code styles, particular where I changed global CSS mulitple times, leaving old code in a big fat mess. There's a lesson to be learned there somewhere.

The second problem, photos, I just gave up on. I decided I would end up wasting too much time trying to make the thing look pretty, and I'd never get around to posting anything. So my photos are always dropped randomly into the blogs - it's better than a whole wall of prose (probably).

But I've been happy overall, the main reason being I don't have to maintain anything, I don't have to worry about my web server going down, I don't have versions of a blog platform to maintain, patch, upgrade; I can Just Write.

But last week my boss and my colleague were both on at me to try Hugo, a site generator created by my boss. I was resistent because I do not want to maintain my own blog platform, but then Christian explained how I can write my posts in markdown, use Hugo to generate the content, and then host it github pages. It sounded relatively painless.

I've been considering a move to something that supports markdown for a while, for the following reasons:

  1. These days I write at least half of my posts on the plane, so I use TextEdit to write the content, and later paste this into blogger and add formatting. It would be better if I could write markdown to begin with.
  2. Although I've always disliked wiki-type syntax for documentation, markdown is actually not despicable, and lets me add simple formatting easily without getting in my way or breaking my flow.

So I spent a few days playing with Hugo to see what it was, how it worked, and whether it was going to help me. I've come up with a
few observations:

Hugo really is lightning fast. If I add a .md file in the appropriate place, and with the Hugo server running on my local machine it will turn this into real HTML in (almost) less time than it takes for me to refresh the browser on the second monitor. Edits to existing files appear almost instantly, so I can write a post and preview it really easily. It beats the hell out of blogger's Preview feature, which I always need to use if I'm doing anything other than posting simple prose.

It's awesome to type my blog in IntelliJ. Do you find yourself trying to use IntelliJ shortcuts in other editors? The two I miss the most when I'm not in IntelliJ are Cmd+Y to delete a line, and Ctrl+Shift+J to bring the next line up. Writing markdown in IntelliJ with my usual shortcuts (and the markdown plugin) is really easy and productive. Plus, of course, you get IntelliJ's ability to paste from any item in the clipboard history. And I don't have to worry about those random intervals when blogger tells me it hasn't saved my content, and I have no idea if I will just lose hours of work.

I now own my own content. It never really occurred to me before that all the effort I've put into three years of regular blogging is out there, on some Google servers somewhere, and I don't have a copy of that material. That's dumb, that doesn't reflect how seriously I take my writing. Now I have that content here, on my laptop, and it's also backed up in Github, both as raw markdown and as generated HTML, and versioned. Massive massive win.

I have more control over how things are rendered, and I can customise the display much more. This has drawbacks though too, as it's exactly this freedom-to-play that I worry will distract me from actual writing.

As with every project that's worth trying, it wasn't completely without pain. I followed the (surprisingly excellent) documentation, as well as these guidelines, but I did run into some fiddly bits:

  1. I couldn't quite get my head around the difference between my Hugo project code and my actual site content to begin with: how to put them into source control and how to get my site on github pages. I've ended up with two projects on github, even though the generated code is technically a subtree of the Hugo project. I think I'm happy with that.
  2. I'm not really sure about the difference between tags, keywords, and topics, if I'm honest. Maybe this is something I'll grow into.
  3. I really need to spend some time on the layout and design, I don't want to simply rip off Steve's original layout. Plus there are things I would like to have on the main page which are missing.
  4. I needed to convert my old content to the new format
  5. Final migration from old to new (incomplete)

To address the last point first, I'm not sure yet if I will take the plunge and do full redirection from Blogger to the new github pages site (and redirect my domains too), for a while I'm going to run both in parallel and see how I feel.

As for the fourth point, I didn't find a tool for migrating Blogger blogs into markdown that didn't require me to install some other tool or language, and there was nothing that was specifically Hugo-shaped, so I surprised myself and did what every programmer would - I wrote my own. Surprising because I'm not normally that sort of person - I like to use tools that other people have written, I like things that Just Work, I spend all my time coding for my job so I can't be bothered to devote extra time to it. But my recent experiences with Groovy had convinced me that I could write a simple Groovy parser that would take my exported blog (in Atom XML format) and turn it into a series of markdown files. And I was right, I could. So I've created a new github project, atom-to-hugo. It's very rough, but a) it works and b) it even has tests. And documentation.

I don't know what's come over me lately, I've been a creative, coding machine.

In summary, I'm pretty happy with the new way of working, but it's going to take me a while to get used to it and decide if it's the way I want to go. At the very least, I now have my Blogger content as something markdown-ish.

But there are a couple of things I miss about Blogger:

  1. I actually like the way it shows the blog archive on the right hand side, split into months and years. I use that to motivate me to blog more if a month looks kinda empty
  2. While Google Analytics is definitely more powerful than the simple blogger analytics, I find them an easier way to get a quick insight into whether people are reading the blog, and which paths they take to find it.

I don't think either of these are showstoppers, I should be able to work around both of them.

Why Java developers hate .NET

I have been struggling with .NET. Actually, I have been fighting pitched battles with it.

All I want to do is take our existing Java client example code and write an equivalent in C#. Easy, right?

Trisha's Guide to Converting Java to C

Turns out writing the actual C# is relatively straightforward. Putting to one side the question of writing optimal code (these are very basic samples after all), to get the examples to compile and run was a simple process:

Continue reading "Why Java developers hate .NET"

Validation with Spring Modules Validation

So if java generics slightly disappointed me lately, what have I found cool?

I'm currently working on a web application using Spring MVC, which probably doesn't come as a big surprise, it seems to be all the rage these days. Since this is my baby, I got to call the shots as to a lot of the framework choices. When it came to looking at implementing validation, I refused to believe I'd have to go through the primitive process of looking at all the values on the request and deciding if they pass muster, with some huge if statement. Even with Spring's rather marvelous binding and validation mechanisms to take the worst of the tasks off you, it still looked like it would be a bit of a chore. Given all the cool things you can do with AOP etc I figured someone somewhere must've implemented an annotations-based validation plugin for Spring.

And they have. And there's actually a reasonable amount of information about how to set it up and get it working. The problem is that it's pretty flexible and has a lot of different options, so when you are running Java 1.5 and Spring 2.0, and actually want to use the validation in a simple, straightfoward fashion, the setup instructions get lost.

So here's my record so I don't forget in future how I did it.

As a brief summary for those who may not be familiar with Spring, or for those who need reminding (no doubt me in a few months when I've completely forgetten what I was working on), Spring provides a Validator interface that you can use to easily plug validation into your application. In the context of web applications, you create your various Validators and in your application context XML file you tell your Controllers to use those validators on form submission (for example).

Spring Modules validation provides a bunch of generic validation out of the box for all the tedious, standard stuff - length validation, mandatory fields, valid e-mail addresses etc (details here). And you can plug this straight into your application by using annotations. How? Easy.

This is my outline application context file:

<?xml version="1.0" encoding="UTF-8"?>
<beans xmlns=" http://www.springframework.org/schema/beans"
xmlns_xsi="http://www.w3.org/2001/XMLSchema-instance "
xmlns_vld="http://www.springmodules.org/validation/bean/validator "
xsi_schemaLocation="http://www.springframework.org/schema/beans http://www.springframework.org/schema/beans/spring-beans-2.0.xsd
http://www.springmodules.org/validation/bean/validator http://www.springmodules.org/validation/bean/validator.xsd">

    <vld:annotation-based-validator id="validator" />

    <!– Load messages –>
    <bean id="messageSource"
        class="org.springframework.context.support.ResourceBundleMessageSource">
        <property name="basenames" value="messages,errors" />
    </bean>

    <!– Bean initialisation for validation. You can put these explicitly into your controllers or set to autowire by name or type –>
    <bean id="messageCodesResolver"
        class="org.springmodules.validation.bean.converter.ModelAwareMessageCodesResolver" />

</beans>

Really all you're interested in is the addition of the validation namespace and schema at the top of the file, and the <vld:annotation-based-validator id="validator" > line which is your actual validator. The other sections are a message source so your error codes can have meaningful messages and a MessageCodeResolver to make use of these.

Eclipse does seem to moan about the way the springmodules schema is referenced, but when you actually start Tomcat up it seems happy enough.

I've chosen to give the validator the ID validator because I turned autowire by name on so that all my controllers picked up this validation by default. Note: autowire can be a little bit dangerous and I've actually turned it off now because I had a validator bean and a validators list in the context file and my poor SimpleFormController controllers were getting a bit confused over which one to use (in truth, the single validator was overwriting the list, which was not what I was after at all).

Anyway. Now what? We have a validator and we've probably wired it into the relevant controllers, either by autowiring them or poking it specifically into our controllers like this:

<bean id="somePersonController"
    class="com.mechanitis.examples.validation.controller.MyPersonController">
    <property name="commandClass"
        value="com.mechanitis.examples.validation.command.PersonCommand" />
    <property name="formView" value="person" />
    <property name="successView" value="success" />
    <property name="validator" ref="validator"/>
</bean>

Next step is to add some validation rules. The documentation will show you how to do this using an XML file, which you're perfectly welcome to do. However, what I wanted to show is how to use annotations on your command object to declare your validation. So here you are:

import org.springmodules.validation.bean.conf.loader.annotation.handler.CascadeValidation;
import org.springmodules.validation.bean.conf.loader.annotation.handler.Email;
import org.springmodules.validation.bean.conf.loader.annotation.handler.Length;
import org.springmodules.validation.bean.conf.loader.annotation.handler.Min;
import org.springmodules.validation.bean.conf.loader.annotation.handler.NotNull;

public class PersonCommand {
private static final int NAME_MAX_LENGTH = 50;

    @NotNull
    @Length(min = 1, max = NAME_MAX_LENGTH)
    private String name;

    @Min(value=1)
    private Long age;

    @Email
    private String eMail;

    @CascadeValidation
    private RelationshipCommand relationship = new RelationshipCommand();

    private String action;

    //insert getters and setters etc

}

Note that @CascadeValidation tells the validator to run validation on the enclosed secondary Command.

This is just a simple example obviously. But hopefully you can see that now you've got the validator set up correctly in your application context file, all you need to cover 90% of your validation needs is to tag the relevant fields with the type of validation you want. If you want to get really clever, the validator supports Valang which allows you to write simple rules. For example, if I only want to validate the name when I'm saving the person rather than passing the command around for some other purpose, I might change the annotations on the name field:

@NotNull(applyIf="action EQUALS ‘savePerson’")
@Length(min = 1, max = NAME_MAX_LENGTH, applyIf="action EQUALS ‘savePerson’")
private String name;

That's the basics. Before I let you go off and play though, a word about error messages. As usual with Spring validators, you can specify pretty messages to be displayed to the user when things go wrong. In my application context file above you should see that I've specified a properties file called errors. In this file you can map your error codes to the message to display. When using the spring modules validation I found the error codes generated were like the ones below so you might have an errors.properties file that looks like this:

# *** Errors for the Person screens
PersonCommand.age[min]=An age should be entered
PersonCommand.name[length]=Person name should be between 1 and 50 characters
# etc etc

# *** General errors
not.null=This field cannot be empty

Go play.